Showing posts with label AdSense. Show all posts

Monday, 16 March 2015

adsense website optimization, adsense site optimization

Do you use Google AdSense to monetize your site? Then check out these top 5 optimization tips straight from Google!

Top AdSense Optimization Tips

1. Maximize your AdSense coverage
In order to maximize your earnings, place three AdSense ad units and three link units on each of your pages. The more ads you display, the more opportunities you have for your users to engage with them.

Also, because some ads are paid on a cost-per-impression (CPM) basis, you will often be paid just for displaying the ads, regardless whether a user clicks on them.

2. Place your ads above the fold
Ads that appear higher on the page perform the best. Place your ads so users can see them without scrolling down the page. The more a user has to scroll before finding your ads, the less likely they are to see them and to click on them.

3. Use the best performing ad units
Our advertisers’ preferred ad units are the Leaderboard (728×90), the Medium Rectangle (300×250) and the Wide Skyscraper (160×600). By using these popular ad units, you’ll be tapping into a larger pool of competing ads. More ad inventory leads to more competition in the ad auction and ultimately results in higher RPMs for our publishers.

4. Show text and image ads
Check your ad units and make sure that you’ve opted-in to displaying text and image ads. By diversifying your ads, you’re able to increase the available inventory for your site. With most text ads paid on a cost-per-click (CPC) basis and most image ads paid on a cost-per-impression (CPM) ad, you can let AdSense determine which ads will maximize your earnings.

5. Complement your content with your ads
Your AdSense ads should fit seamlessly within your site to improve your users’ experience. Blend the color of your ads to match the rest of your site and remove the borders around your ad units to help your ads complement your content and enhance your site.

Bonus Tip: Opt-in to Placement Targeting
Set up Custom Channels in your AdSense account and opt-in to Placement Targeting. Placement targeting allows our advertisers to bid on a specific ad or group of ad placements on your site. Advertisers are usually willing to bid more for targeted units.

Have additional questions? Check out http://adsense.google.com/support

And that’s it. At the end of the day, it's all about testing your ads and monitoring how they perform for you on your site. Stay tuned with Netdoz, Good luck!
Adsense Optimization Tips Straight From Google
22:40

Adsense Optimization Tips Straight From Google


responsive places to add adsense ads

In this article we'll talk about the most common 10 places in our blog where we can add AdSense ads and about how we can implement these and we'll get to know as well which are the most suitable formats based on those available in our AdSense account.

Adsense Advertisements

In the Sidebar

adsense, ads, add adsense blogger

How to implement

This is one of the easiest areas to put AdSense. Just go to the Page Elements (Layout), click on the "Add a Gadget" link, then add an HTML/Javascript widget with your ad code inside it or add directly an AdSense widget.

Recommended formats: 125 × 125, 120 × 600 and 160 × 600, 300 x 600

Between posts

blogger posts, blogger tricks, adsense ads

Implementation. You can add AdSense ads between your posts by going to Layout, click on the "Edit" link below the Blog Posts section, then check the "Show Ads Between Posts" option.

Recommended formats: 468 × 60, 300 × 250 and 336 × 280

Under the header

blogger header, blogger tips, adsense

Implementation:

Before anything, you need to convert your AdSense ad code - you can use this converter here:

AdSense Ad Converter

Next thing to do is to go to your Blogger Template (log in to your Blogger Dashboard, click on Template and press the Edit HTML button) and click anywhere inside the code area to search for the following code using the CTRL + F keys:
<div id='header-wrapper'>
Paste the converted code right after it.

Recommended formats: 728 × 90 and 728 × 15

Above the blog posts


make money, adsense, blogger tutorials

Implementation:

Convert your ad code and search for <div id='main-wrapper'> in your template.

Paste the converted code right after it.

Recommended formats: 460 × 68, 468 × 15 and 336 × 280

Under the post title (this will be visible on all the pages)

money online, blogger tricks, how to blogger
Implementation:

Convert your AdSense ad code and go to your Template > Edit HTML > click anywhere inside the code area and search for the following line (CTRL + F):
<div class='post-header-line-1'/>
Note: if you can't find it, search it without the ending slash /

Paste the converted code right after it.

Recommended formats: 468 × 68 and 468 × 15

Under the post title (visible only on the posts pages)

Implementation:

Convert your ad code and then go to your Template, click anywhere inside the code area and look for:
<div class='post-header-line-1'/>
Note: if you can't find it, search it without the trailing slash /

Paste the converted code, following this example:
<b:if cond='data:blog.pageType == "item"'>

<!-- Add here the code of your ad -->

</b:if&gt
Recommended formats: 468x68 and 468x15

In the posts' footer

post footer, adsense, blogger blogspot

Implementation:

Convert your ad code and then go to your Template > click anywhere inside the code area and look for:
<p class='post-footer-line post-footer-line-3'/>
Note: if you can't find it, search it without the trailing slash /

Paste the converted code right after this line.

Recommended formats: 468x68 and 468x15

In the post's body (it will be visible on all pages)

adsense how to, blogger tricks, gadgets

Implementation:

Convert your ad code and then go to your Template > click anywhere inside the code area and look for:
<div class='post-body entry-content'>
Note: in case you don't fint this code, search only for <div class='post-body'>

And paste the converted code by following the example below:
<div style='float:right'>

<!-- Add here the code of your ad -->

</div>
Recommended formats: 125x125, 180x150, 120x240 and 200x200

In the post's body (visible only in post pages)

Convert your ad code and then go to your Template, click anywhere inside the cod area and look for:
<div class='post-body entry-content'>
Note: in case you don't fint this code, search only for <div class='post-body'> 

And paste the converted code by following this example:
<b:if cond='data:blog.pageType == "item"'>
<div style='float:right'>

<!-- Add here the code of your ad -->

</div>
</b:if>
Recommended formats: 125x125, 180x150, 120x240 and 200x200

Between post and comments (visible only on posts pages)


Implementation:

Convert your ad code and then go to your Template, click anywhere inside the code area and look for:
</b:includable>
<b:includable id='postQuickEdit' var='post'>
Paste the converted code just above it, following this example:
<b:if cond='data:blog.pageType == "item"'>

<!-- Add here the code of your ad -->

</b:if>
Recommended formats: 468x60, 300x250 and 336x280

In the blog's footer

blogger footer, adsense ads, make money online

Implementation:

Convert your ad code and then go to your Template, click anywhere inside the code area and look for:
<div id='footer-wrapper'>
Paste the converted code right after it.

Recommended formats: 728x90 and 728x15

FAQ

Some questions that are likely to arise:

I can't find the codes, what should I do?
When searching for a specific code, make sure that you have no spaces before/after it. These are the default codes of Blogger and should be found in all the templates unless they have been modified by the template designer.

Why should I convert my AdSense code?
The Blogger's Template reads it as text and not as code so it is better to avoid any errors when trying to save it.

The ads are not displaying properly, why is that?
The ads could be affected by the styles (CSS) selectors (divs) containing them and some templates could be wrong designed, then you should consider modifying these styles, look for another relevant place or in extreme cases, change the template.

Can I put the all 10 codes on my blog?
No, you should choose just one of the locations where you want to put the ads considering that AdSense have some limits on the number of ads that could be displayed. Try to make a balance with your content.

Why there should be only 3 ads displayed on the main page?
This is due to the limit set by AdSense. Combine the type of ads (text, rich media ads and link units) if you want to show more ads.
Hopefully, this guide will be useful to those of you who need to display AdSense ads on your blog. Share the blog and post, Stay tuned with Netdoz for more informative stuff.
10 Places to Put AdSense Ads in Blogger
22:33

10 Places to Put AdSense Ads in Blogger


adsense ads in blogger posts

In a previous post we saw how and where we can place Adsense ads on our blog; however, these methods would only work when we place the ads on predetermined and fixed locations. For posts area, the most common places are below the title, at the beginning of the post or at the end of the post.

But what if we want to display an AdSense ad in the middle of a post?

We can manipulate the location of the ads to be displayed by adding a script inside the template and using a tag inside our post to where we want the AdSense ad to appear. Once added, we can place the ads anywhere, be it between paragraphs or in the middle of the content etc.

Manually inserting Adsense ads in the middle of posts in Blogger is pretty simple, just follow these steps below:

Before proceeding, it is recommended do backup your template (go to Template > click on the Backup/restore button)

Step 1. First thing we need to do is to "parse" the AdSense code, in other words, convert it to plain text. Then go to Template, click on the Edit HTML button, click anywhere inside the code area and look for this tag (CTRL + F):
<data:post.body/>
Note: you may find it several times, but we need to stop at the second one or if you can't see any changes, test the third one

how to add adsense ads anywhere in blogger post, how to add adsense ads in posts, adsense ads in middle of blogger posts, netdoz, netdoz.blogspot.com
Screenshot
Step 2. Replace the <data:post.body/> tag with this code:
<div expr:id='"adsmiddle1" + data:post.id'></div>
<b:if cond='data:blog.pageType == "item"'>
<b:if cond='data:blog.pageType != &quot;static_page&quot;'>
<div style="clear:both; margin:10px 0">
<!-- Add here the code of your ad -->
</div>
</b:if>
</b:if>
<div expr:id='"adsmiddle2" + data:post.id'>
<data:post.body/>
</div>
<script type="text/javascript">
var obj0=document.getElementById("adsmiddle1<data:post.id/>");
var obj1=document.getElementById("adsmiddle2<data:post.id/>");
var s=obj1.innerHTML;
var r=s.search(/\x3C!-- adsense --\x3E/igm);
if(r>0) {obj0.innerHTML=s.substr(0,r);obj1.innerHTML=s.substr(r+16);}
</script>
Step 3. Put the converted Adsense code to where you see the <!-- Add here the code of your ad --> annotation, then save the changes by clicking on the Save template button.

Note: For centering ads, add the center tag before and after the AdSense code, like this:
<div style="clear:both; margin:10px 0">
<center>
<!-- Add here the code of your ad -->
</center>
</div>
Step 4. When you create a New Post, add this tag inside the HTML section to where you want the Google AdSense ads to appear:
<!-- adsense -->
For example:
<div>This is a demo text. This is a demo text. This is a demo text. This is a demo text. This is a demo text. This is a demo text. This is a demo text. This is a demo text. This is a demo text. This is a demo text.</div>
<!-- adsense --><div>This is a demo text. This is a demo text. This is a demo text. This is a demo text. This is a demo text. This is a demo text. This is a demo text. This is a demo text. This is a demo text. This is a demo text.</div>

how to add adsense ads anywhere in blogger post, how to add adsense ads in posts, adsense ads in middle of blogger posts, netdoz, netdoz.blogspot.com
Screenshot
Note: If you don't add the label to bring up the ad, then the ad will appear below the title by default.

And you don't have to worry about violating the Google's Terms of Service because applying this method we are not changing the structure of the ad. Share the blog and post, Stay tuned with Netdoz.
How to Add AdSense Ads in Blogger Posts
12:50

How to Add AdSense Ads in Blogger Posts


How to get approved for google adsense, how to get approved google adsense account,  tip for google adsense, useful tips to get approved for google adsense, how to get google adsense, what to do before applying for google adsense, netdoz, netdoz.blogspot.com

It seems that everyone wants to make money by joining up with Google AdSense and why not? Google AdSense is a relatively simple, straightforward way to actually start earning some extra money with your efforts.
However, things have changed from the early days of AdSense when joining was not much of an issue. Today, applying for AdSense takes more effort and some preparation so that you can take full advantage of their services.
First, you will need a good reason to apply for AdSense so you can reap the benefits that they offer. Here you will find out more about what Google AdSense is all about, what they offer and how you can properly prepare yourself before joining to really take advantage.


What is Google AdSense?

One of the most established internet networks to offer advertisement publishing, AdSense uses the Pay Per Click (PPC) system to help businesses reach out to others on the web. At one time, Google used to provide AdSense to everyone who used their Blogspot program, but now that has changed. 

Today, AdSense is one of the most respected thanks to the many thousands of satisfied publishers and customers who use the service. It is straightforward, easy to use and always pays on time which makes it very attractive to anyone wanting to have this service. If you do your work the right way, it will pay better than any other similar service on the web.

However, it is their very success that now makes them harder to join. When you apply, everything has to be just right otherwise you will not be approved.

How to Avoid Getting Your Application Rejected

There are a number of things to avoid when applying for AdSense so that your entry will not be discarded. Here are just a few.

Read Google Policies: Just like studying for a test, Google posts their policies about what it takes for your site to get into AdSense. So, take the time to read them and be sure that your website follows the rules.

Have Good Content: If your website doesn't have good or sufficient content, it will not be accepted. So, be sure that you provide them with enough to review. In addition, it has to be neat, professional and grammatically correct otherwise it will give them the excuse to toss out your application.

Aesthetically Pleasing: Garish yellows and lots of distracting glitz will also stop you in your tracks when you apply for AdSense. Your website should have a good, solid design that is comfortable to look at and pleasing for the visitor.

Post Your Contact Information: If Google cannot find a way to contact you through your website, you might as well not apply. Having an "About Us" page that is complete with contact info is the minimum to getting accepted.

Now that you've done the basics, it is time to hedge your bets when it comes to applying for AdSense by adding in items and procedures that will enhance your chances. While nothing is guaranteed, the following steps will help your website in getting approved.

10 Ways to Increase Your Chances when Applying for AdSense

1. Policy for Privacy

It may seem odd to have a privacy policy for your blog, but it is vital if you want to get AdSense approval. Without it, you might as well not apply at all. The policy itself should describe to those who visit your blog what they will see and what they can and cannot do.

2. Contact Information

This is where you put in your contact information. At the very least, it should consist of an email so that readers can contact you directly about any issue they have on your blog.

3. About Us

This is where you tell people a little about who you are, what your business does and how you are going to accomplish it. This is sort of like an introductory page to your efforts and it critical when you apply for Adsense.

4. Email & Name Verification

Be sure that you put your email as well as your name in your About Me or Contact Us page so that it will help Google verify you quickly.

5. Verify Age

Always use your correct name and date of birth when applying for AdSense. This is mostly for those who are under 18, but it is important to be truthful otherwise you'll never get approved.

6. Appropriate Design

Your blog should look attractive, professional and easy to use. You don't have to be fancy or pour in thousands of dollars, just make it clean and neat will be sufficient.

7. Have Plenty of Posts

Do you know that there is no minimum number of posts stated by Google in terms of what is required for joining AdSense? Even so, if you only have a handful, do not count on getting approved. You should shoot for about 500 or so before applying to demonstrate your seriousness about your efforts and make sure that they are at least 500 words in length.

8. Remember the Rules

No pornography, illegal items, advocating drug use or other items that will not get you any AdSense at all. Plus, if your posts are all less than 200 words, that will not work either.

9. Adds Value

Your blog or website must provide real value for your audience. This will not only help keep people visiting your site, but it will also impress Google as well.

10. Unique, Top Level Domain

Basically, this means that your domain should be a ".com" in order to succeed. Plus, the name itself needs to be short as possible, related to your area of interest and easy to remember.

When applying for AdSense, you will need to keep all of these things in mind so that you will be accepted. However, all of the attributes that Google AdSense requires are also ones that will boost your website as well. So, keep this in mind when you apply for AdSense because the result will be a blog that will start earning you another income stream that can build over time.Share the post and blog, stay tuned with Netdoz
Useful Tips Before Applying for Google AdSense
12:47

Useful Tips Before Applying for Google AdSense


how to detect invalid activity in google adsense, how to know about invalid activity in google adsense, how to get google adsense, monitor google adsense,
Monitoring your website's performance shouldn't be a chore but a necessity. After all, how else will you know how to serve your audience better - and acquire new ones - if you don't know how they get to you, what they do on your site and who they are? Google Analytics is a tool that does all that, but despite its sophistication, your account can be suspended for invalid activity.

This is the one thing that you have to avoid because the process of reinstating your account may take a while. That said, how can you detect invalid activity?

Before answering the question, here are some terms that you need to familiarize yourself with as they will appear throughout the rest of this post:

DEFINITIONS
Clicks - number of times a user has clicked on your advertisements
CPC - cost per click; what you get whenever a user clicks on your ads
Pageviews - refers to the action the user takes of viewing a page with an ad displayed
CTR - click through rate; calculated as (clicks / pageviews) x 100 and is given in percentage
Estimated Earnings - calculated as (clicks x CPC); the value goes up or gown while the earnings are still in verification process

4 WAYS TO DETECT INVALID ACTIVITY

1. You have a CTR above 20%. The normal range for CTR is 1% to 11%, but anything above these tells Google that there is something iffy and that may not bode well for you. So, if you notice this, make necessary changes so that you maintain a healthy CTR.

2. You have a lot of clicks but no CPC. As in, your assigned CPC is 0.00. For example, if you get about 50 clicks and don't have a CPC set, that tells Google that something funky is going on and they will not hesitate to take action. Keep in mind that they do take matters like this seriously, and which is why they employ both human and machine checking to analyze clicks and impressions.

3. You're estimated earnings rise then fall suddenly. For example, you get estimated earnings of $1.00 but the next minute this drops to $0.0. Whether it drops to zero or half the original estimated earnings amount after you refreshed the page, you know that something is up.

4. You have many clicks from one country but less pageviews. Google operates on the belief that if a user clicked on an ad, they are interested in what it has to say. So, if the pageviews are really low, that sends a wrong signal to Google and causes them to think that something fishy is happening.

So, make sure to check your AdSense performance regularly so you can spot discrepancies and address them as soon as possible before Google decides to suspend your account. Share the blog and post, Stay tuned with Netdoz
How to Detect Invalid Activities in Google AdSense
12:46

How to Detect Invalid Activities in Google AdSense


adsense access authorization, google adsense access,

It is amazing when you see a webmaster using a blogspot blog stealing an AdSense Java Script Code and using it on their website. They will usually keep your unique publisher ID while showing ads from your account. While their action may be unintentional in terms of them not caring which ID that they use, the net effect is that you are now involved in their illegal action.

Whatever their reason for doing so, once they are caught and banned for using illegal and plagiarized materials, chances are that Google will also ban your Adsense account as well because it violates the terms of service and the program polices even though you may not have been aware that this happened to you. It doesn't really matter to Google because they see your unique publisher ID and assume that it is you posting the illegal materials.

In addition, there are websites that also use the iFrame HTML program that will embed to the post and pages of your website as well. This means that you are now violating the Terms of Services as well as the Program Policies because they are showing the AdSense ads inside an iFrame which is forbidden. Again, because it is your website, Google will assume that it is you unless you can take appropriate action.

While this may seem unfair, it must be noted that Google has recognized the practices of others in using the websites and unique publisher ID, so they have developed a new feature called "Access and Authorization" that you can find within the dashboard of AdSense. It is here that you can only allow certain sites to show ads for your account and not have to worry about getting punished for something that you did not do.

Access and Authorization Usage

You will need to log into your AdSense account and then proceed to "Site Authorization" which will then let you check the mark to allow only certain ads to be shown for your account. When you check the box that allows only certain sites, it will ask you which domains that you are allowing to show on your website and what has permission to use your ad code:

how to use adsense access authorization feature, what is authorization access in google adsnse netdoz, netdoz.blogspot.com

Here, you will need to type in all the websites or domains that you have granted permission and save the changes you have made by clicking the "Save" button. While it may be tempting to not list any, you will need to list the following in order to fully comply with the request and not create any more confusion:

- Your Domains: Any domains and sub-domains that you own where you want to monetize them with AdSense.
- Country Specific TLDs: Basically, any country-specific TLDs of Google will need to be included as well, for example a .blogspot.com blog (see the screenshot below). To find a complete list of all Google domains, click HERE.
- Translate Site: If some of your customers are using translation sites to visit your website, then you'll want to at least include the major ones such as Google Translate and others. You can find a list of the major ones or stick to Google if you like.
- Yahoo & Bing Domains and Sub-Domains: Wherever your articles are being read, you'll need to include these sites as well.
- Articles: If you are using articles from other websites that have your ad code and you have promised to share your AdSense revenue with the parties involved, then you will need to enter all of the article URL codes separately in order to make sure that they are authorized.

how to use adsense access authorization feature, what is authorization access in google adsnse netdoz, netdoz.blogspot.com

If you were to use a domain name that is not on your list of authorized websites, but it does use your ad code, then you will see alerts on your dashboard to notify you. If these are legitimate sites that you want to use your ad code, but simply did not put them on the list you can do so thanks to the warning provided on your dashboard:
We've noticed your ad code has appeared on websites you haven't authorized. To avoid lost revenue, make sure to authorize any sites you own to display ads by visiting your account settings.
However, if these sites are not authorized, then you can feel comfortable by ensuring that their domain is not on your list and Google will not punish you for the theft by others.

Also, keep in mind that any domain name that is using your ad code and is not authorized will remain in place and not generate any money for you. So, you cannot profit by the theft of others even when they are using your ad code. While this may seem unfair in a sense, the way the process works does keep your website from being punished for what someone else has done.

Additional Notes for Using Access and Authorization on AdSense

There are a number of things that you will need to be aware of when using this particular program. First, be sure that you check it frequently so that you can catch any warning early on. You only need to sign into your account and check the dashboard where the authorization is located. By checking frequently, you can catch those who are authorized and add them to your account.

Remember that any partner websites of Adsense such as youtube.com, blogspot.com, blogger.com etc. are fully authorized to show your ads without having to add them to your account listing. All partner websites of AdSense qualify, so you only need to restrict yourself to the sites that are outside that particular area.

When you add a domain to your list of sites that are authorized to use your ad code, they will automatically be added to your list of sites that you own as well. This means that you don't have to add them twice and can limit your efforts to just the first authorization part.

You'll want to use this feature in order to avoid any misunderstanding and especially to avoid being punished for something that you did not do. However, you'll need to prepare a bit before entering all of the applicable domains that can use your ad code. By taking a little time and going over all the places where they appear, you can add them in and get the greatest benefit from this particular feature of AdSense.

Access and Authorization Feature in Google AdSense
12:35

Access and Authorization Feature in Google AdSense


track invalid clicks, google adsense clicks

A lot of things can happen online, some of which are beyond your control. One of these is invalid click activities that are caused by a number of things, but can lead you into one unfortunate situation - getting banned from AdSense for good. Since you need AdSense to keep track of your website's performance, you should do anything possible to protect yourself against invalid clicks.
StatCounter can help you in this mission. This is a web traffic analysis tool that lets you track all clicks and exit links. Through it, you will know where a majority of your invalid clicks are coming from, and the corresponding IPs that you can then block to protect your AdSense account.
Getting started is as easy as signing up and creating an account. You can then create a new project for a website that you want to track. Like most analytics tools, StatCounter is fairly easy to use. Make sure to select a counter or Invisible tracking, and opt to receive reports in a weekly or monthly basis, so that you can keep an eye on invalid AdSense clicks.


After entering the appropriate information, press the "Add Project" button which will take you to the "Choose an installation Guide for your website" page - here click the "Default Installation Guide" link. Now, StatCounter will give you a code along with instructions on how to install this code on your website. After adding the code, press the "Check Installation" button on the right toward the bottom of the page in order to finish the installation process.

Tracking Exit Links

Once you have added StatCounter to your website, your reports will be available within minutes. Now let's see how to track invalid AdSense Clicks using StatCounter.
Click on Stats and click on the menu called "Exit Link Activity". This will show all the links that visitors clicked on to leave your website. Here, you can also find Date, Time, Exit Link Clicked and the page on which the exit link was clicked.

The exit link could be a advertisement or a link to other website. To display only the clicks on the AdSense ads, use the "Exit Link Match" filter to 'google adsense'. This way, you will be able to see how many clicks are there on advertisements and at what time the click was made.
To see even more information about a particular visitor who clicked on the link, click on the magnify icon. This will show you the Search Referral, IP Address of the visitor, Host Name, their Location, how many times they've visited your blog before, Visit Length, Browser, OS, Resolution, ISP, and the pages they viewed including the exit links.


So this is how you can track the invalid AdSense clicks using StatCounter. Although you may have to disable advertisements on your website temporarily to avoid a potentially disastrous situation, such as being click bombed, it is a better alternative than being kicked out of AdSense permanently. Through StatCounter, you will be able to detect invalid clicks or any suspicious activities that will inflate the number of clicks on an ad. Since you can't control an advertiser or publisher's desire to increase their earnings, you should monitor click through rates or the cost per clicks you are making. If there is a sudden increase of clicks but you make zero CPC, it's time to track down on these invalid Adsense clicks and put a stop to them.

Share the post and blog, Stay tuned with Netdoz
How to Track Invalid AdSense Clicks With StatCounter
12:23

How to Track Invalid AdSense Clicks With StatCounter


Saturday, 14 March 2015


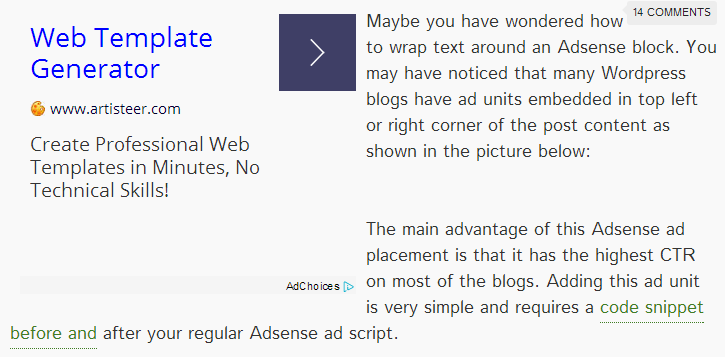
Maybe you have wondered how to wrap text around an Adsense block. You may have noticed that many Wordpress blogs have ad units embedded in top left or right corner of the post content as shown in the picture below.

The main advantage of this Adsense ad placement is that it has the highest CTR on most of the blogs. Adding this ad unit is very simple and requires a code snippet before and after your regular Adsense ad script.

blogger tricks

If you want to add a ad unit in top right corner of your post, then include the red lines below in your ad code:
<div style="float:right;">
Your Adsense ad script
</div>
If you want to place ad unit at left corner, change the float tag to "left":
<div style="float:left;">
Your Adsense ad script
</div>
The most appropriate for this ad placement is 250×250 square ad unit. Placing AdSense unit in the middle of the post, may disturb the reading flow, so I'd recommend to have ad units at the beginning of the post.

If you have any query adding this ad unit in your blog post, just leave a comment below. Stay tuned with Netdoz
Wrap Text Around Adsense Block in Left or Right Corner
06:25

Wrap Text Around Adsense Block in Left or Right Corner


Wednesday, 11 March 2015

tips to avoid getting adsense banned

As many of you already know, Google Adsense is the most popular and generous advertisment service from Google that gives you recurring income. However, some people don't bother to read the Adsense policies and they usually violate AdSense Terms and conditions without knowing and as a result, later to find out that their accounts have been disabled. Many times, fraud clicks are the main cause. But there could be many other reasons for an Adsense account to be disabled.

So, if you want to keep your Google Adsense account safe, please read and keep in mind the following rules:

  1. Never use adult, violent or advocating racial intolerance content on your site.
  2. Never copy paste any article from any other website. Google can easily find out which one is original.
  3. Never click on your own ads. Google can analyze all the clicks made on your ad units.
  4. Never place above your Adsense ad units texts like "Click on ad below", "Please click below" etc. instead you can use label headings as "sponsored links" or "advertisements".
  5. Never say your friends to click on your ads on social networking websites like Facebook
  6. Don't put unwanted links, pop-ups on your website. Keep interface quite neat and clean with proper navigation and all. Google also looks for the quality standard of websites.
  7. You must have a privacy policy page which must contain a description about the use of Google AdSense on your website. This is the latest policy introduced by Google. Many webmasters don't know about it which results in their account getting banned.
  8. Hide Adsense ad units from Contact and Privacy Policy page (read here to see how you can do that) Place ads only on Content Pages. Advertisers pay only for content based ads.
  9. Never display Adsense ads in floating boxes with images or texts that could overlap or cover the ads. However, you can use floating text, images on your website under the condition they don't play with your Adsense ads.
  10. Never place more than 3 ad units and 3 ad links or 2 adsense search boxes on any web page.
  11. Do not confuse with adjacent images - It was a common policy to increase CTR by placing same number of images as the number of text ads, which falsely gave the impression that the text ads represented an explanation to these images. Inserting a small space or a line between the images and ads is not allowed. Make sure that the ads and images are not arranged in a way that could easily mislead or confuse your visitors. Read more about this here
  12. Do not send your Google adsense ads code to anyone.
  13. Never place your Google ads any unit under any drop down menu, if you do so you are Violate Google Adsense TOS.
  14. Never place Adsense ads on empty pages (pages with no content), pop-up pages, error pages, contact forms or registration pages.
These rules are the minimum requirements for maintaining an AdSense account in a proper way.
Whenever needed, it is better to ask for adsense help from the learned staff of Google Adsense. At least, you'll get authorized and very helpful tips from them! Good luck and be wise :)
Tips to Avoid Getting Banned from AdSense
12:48

Tips to Avoid Getting Banned from AdSense


add adsense to blogger

If you want to earn money from your site/blog, Google Adsense is the most popular service to monetize your blog or website content. When implemented, Adsense will display targeted Google ads on your blog and they can generate revenue on either a per-click or per-impression basis.

In order to display ads on your site, you should first Sign Up to Google Adsense program.

Before adding your ads, keep in mind that Adsense allows only up to 3 ad units, 3 link units and 2 search boxes per page.

In this tutorial i will show you the three ways you can add Adsense ads to your blog.

1. Adsense Gadget


Use this method to add ad unit as a widget, in places outside the blog post area. You can position it by simply dragging it in Page Elements, just like any other widget. To add the Adsense Gadget, follow these steps:
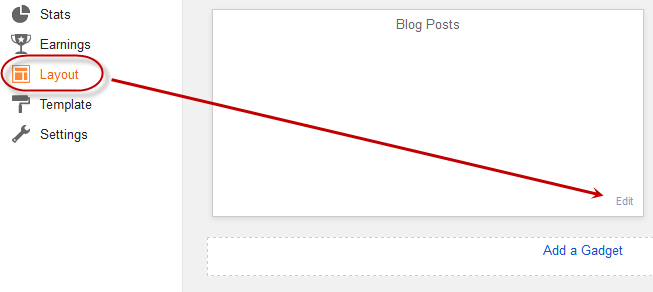
Step 1. Log in to your Blogger Dashboard, go to Layout and click on the "Add a Gadget" link on the right side.

blogger layout, add a gadget

Step 2. From the pop-up window, select the AdSense Gadget

adsense gadget, blogger widgets

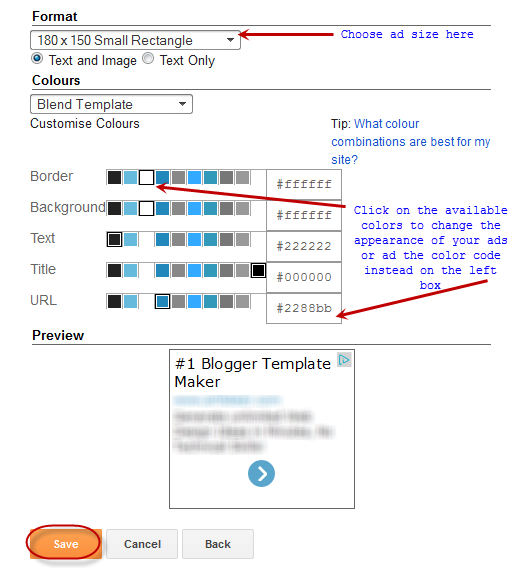
Step 3. Configure ad format and colors (see the screenshot for more details)

adsense format, adsense blogger

Step 4. Finally, click on the Save button and you're done.

2. Inline Ads


This will display an ad unit at the end of each post. To show ads between posts:

Step 1. Go to Design > Page Elements and click the Edit link in Blog Posts gadget box.

blogger posts, blogger layout

Step 2. Check the "Show Ads Between Posts" box.

show ads in blogger

Step 3. Configure ad frequency, ad format, and colors. Live preview is provided beneath the settings.

Step 4. Click on the Save button to save the settings.

3. Adsense code


The most notable benefits of using this method are:
  • You can place ad anywhere in your blog
  • You can add the code anywhere in your blog template - in your post content or page.
  • To find out which format perform the best, custom channels will help you to track the performance of specific groups of ad units.
  • You can choose types other than ad unit i.e. link unit, search box.

To create an ad unit:

Step 1. Go to Google Adsense website.
Step 2. Click on My ads tab, go to Ad units and then click on the "New ad unit" button.


Step 3. Choose your ad type, choose format and colors and assign channels.
Step 4. When you have finished editing, click on the Save and get code >> button and copy the code provided.

To add an ad unit to your blog, you have the following options:
  • Paste the code in a HTML/Javascript gadget
  • Paste the code in the blog post or page HTML section, or
  • Paste the code direct in your template. (if you choose this option, first you should convert adsense ad code)
If you have any more questions, leave a comment below. Stay tuned with Netdoz
How to Add AdSense Ads in Blogger
12:39

How to Add AdSense Ads in Blogger


Friday, 6 February 2015

google adsense account approved trick

Google Adsense the biggest advertisement agency in the World. Getting approved Google Adsense account is not a easy task or a tricky work. You can not use any trick or do any kind of fraud with Adsense system, If you are think something about that then don't waste your time. Its my personal experience i have struggle a lot for this account and even that struggle i did not get approved for Adsense. But finally i got approved adsense account. Its my personal experience that how i got approved for adsense account and today i am gonna share it with you.
If you are blogger or article writer and you want to apply for adsense with that blog, It will take too much time because you will need enough traffic on your blog but the easiest way to get approved for adsense is apply with Youtube.
If you have a Youtube channel with videos then it will be more easy for you but if you don't have Youtube channel and videos then create one channel for temporarily. Upload genuine videos on your channel and get more views on your channel. By the way its very hard to get a lot views on your channel, But i have easy solution for it. Try to upload videos of a famous channel, Show, well known person then every one will be interested to watch video and you will get more views.
I will tell you more easy way as i did, what i did is i went for an audition of a reality tv show and took videos in different places of auditions and uploaded it to channel with that tv show's name which is well known. People already aware of that show and they took interest to watch my videos and i got a lot view on my videos than i expected. Then i applied for Adsense account from Youtube and i got approved for it.
If you can't go every city of audition then i have one more solution for it, Some tv shows uploads their audition's photos on their official website before they broadcast the videos because they need time to edit it.
Log on to their website and download all the audition photos and make a videos with photos and upload it on Youtube by using their show's name. Its not necessary that you upload only audition videos but you can upload videos related with well known names that you can get more views and faster than your own videos. When you get enough views on your channel just apply for adsense through the Youtube. But remember wait for enough views on the channel not necessary that you have to get a lot of subscribers, What important is views in my case i uploaded 13 videos of different auditions and local city celebrities and each video got 20,000 views then i applied for adsense and i got approved without any issue, If you have also worked hard and struggled for adsense i hope it will give you that account.

If this post really helped you, Just share the post and blog, Like Netdoz on social networking
How to Get Approved For AdSense Easily
10:25

How to Get Approved For AdSense Easily