Showing posts with label Blogging. Show all posts

Monday, 16 March 2015

responsive places to add adsense ads

In this article we'll talk about the most common 10 places in our blog where we can add AdSense ads and about how we can implement these and we'll get to know as well which are the most suitable formats based on those available in our AdSense account.

Adsense Advertisements

In the Sidebar

adsense, ads, add adsense blogger

How to implement

This is one of the easiest areas to put AdSense. Just go to the Page Elements (Layout), click on the "Add a Gadget" link, then add an HTML/Javascript widget with your ad code inside it or add directly an AdSense widget.

Recommended formats: 125 × 125, 120 × 600 and 160 × 600, 300 x 600

Between posts

blogger posts, blogger tricks, adsense ads

Implementation. You can add AdSense ads between your posts by going to Layout, click on the "Edit" link below the Blog Posts section, then check the "Show Ads Between Posts" option.

Recommended formats: 468 × 60, 300 × 250 and 336 × 280

Under the header

blogger header, blogger tips, adsense

Implementation:

Before anything, you need to convert your AdSense ad code - you can use this converter here:

AdSense Ad Converter

Next thing to do is to go to your Blogger Template (log in to your Blogger Dashboard, click on Template and press the Edit HTML button) and click anywhere inside the code area to search for the following code using the CTRL + F keys:
<div id='header-wrapper'>
Paste the converted code right after it.

Recommended formats: 728 × 90 and 728 × 15

Above the blog posts


make money, adsense, blogger tutorials

Implementation:

Convert your ad code and search for <div id='main-wrapper'> in your template.

Paste the converted code right after it.

Recommended formats: 460 × 68, 468 × 15 and 336 × 280

Under the post title (this will be visible on all the pages)

money online, blogger tricks, how to blogger
Implementation:

Convert your AdSense ad code and go to your Template > Edit HTML > click anywhere inside the code area and search for the following line (CTRL + F):
<div class='post-header-line-1'/>
Note: if you can't find it, search it without the ending slash /

Paste the converted code right after it.

Recommended formats: 468 × 68 and 468 × 15

Under the post title (visible only on the posts pages)

Implementation:

Convert your ad code and then go to your Template, click anywhere inside the code area and look for:
<div class='post-header-line-1'/>
Note: if you can't find it, search it without the trailing slash /

Paste the converted code, following this example:
<b:if cond='data:blog.pageType == "item"'>

<!-- Add here the code of your ad -->

</b:if&gt
Recommended formats: 468x68 and 468x15

In the posts' footer

post footer, adsense, blogger blogspot

Implementation:

Convert your ad code and then go to your Template > click anywhere inside the code area and look for:
<p class='post-footer-line post-footer-line-3'/>
Note: if you can't find it, search it without the trailing slash /

Paste the converted code right after this line.

Recommended formats: 468x68 and 468x15

In the post's body (it will be visible on all pages)

adsense how to, blogger tricks, gadgets

Implementation:

Convert your ad code and then go to your Template > click anywhere inside the code area and look for:
<div class='post-body entry-content'>
Note: in case you don't fint this code, search only for <div class='post-body'>

And paste the converted code by following the example below:
<div style='float:right'>

<!-- Add here the code of your ad -->

</div>
Recommended formats: 125x125, 180x150, 120x240 and 200x200

In the post's body (visible only in post pages)

Convert your ad code and then go to your Template, click anywhere inside the cod area and look for:
<div class='post-body entry-content'>
Note: in case you don't fint this code, search only for <div class='post-body'> 

And paste the converted code by following this example:
<b:if cond='data:blog.pageType == "item"'>
<div style='float:right'>

<!-- Add here the code of your ad -->

</div>
</b:if>
Recommended formats: 125x125, 180x150, 120x240 and 200x200

Between post and comments (visible only on posts pages)


Implementation:

Convert your ad code and then go to your Template, click anywhere inside the code area and look for:
</b:includable>
<b:includable id='postQuickEdit' var='post'>
Paste the converted code just above it, following this example:
<b:if cond='data:blog.pageType == "item"'>

<!-- Add here the code of your ad -->

</b:if>
Recommended formats: 468x60, 300x250 and 336x280

In the blog's footer

blogger footer, adsense ads, make money online

Implementation:

Convert your ad code and then go to your Template, click anywhere inside the code area and look for:
<div id='footer-wrapper'>
Paste the converted code right after it.

Recommended formats: 728x90 and 728x15

FAQ

Some questions that are likely to arise:

I can't find the codes, what should I do?
When searching for a specific code, make sure that you have no spaces before/after it. These are the default codes of Blogger and should be found in all the templates unless they have been modified by the template designer.

Why should I convert my AdSense code?
The Blogger's Template reads it as text and not as code so it is better to avoid any errors when trying to save it.

The ads are not displaying properly, why is that?
The ads could be affected by the styles (CSS) selectors (divs) containing them and some templates could be wrong designed, then you should consider modifying these styles, look for another relevant place or in extreme cases, change the template.

Can I put the all 10 codes on my blog?
No, you should choose just one of the locations where you want to put the ads considering that AdSense have some limits on the number of ads that could be displayed. Try to make a balance with your content.

Why there should be only 3 ads displayed on the main page?
This is due to the limit set by AdSense. Combine the type of ads (text, rich media ads and link units) if you want to show more ads.
Hopefully, this guide will be useful to those of you who need to display AdSense ads on your blog. Share the blog and post, Stay tuned with Netdoz for more informative stuff.
10 Places to Put AdSense Ads in Blogger
22:33


10 Places to Put AdSense Ads in Blogger


Saturday, 14 March 2015


The Alexa Rank in its time may have been pretty important for the SEO, however, these days is already losing its importance due to the changes in the algorithm that Google applies from time to time.

The company displays information about visitors of a website, which in turn, classifies this in a ranking, generating estimated statistics about visitor traffic and links pointing to the website. In a few words, the Alexa Rank does not directly affect SEO, but rather serves as a reference for measuring the traffic type, popularity by country and other metrics.
If you would like to enrich or have a good Alexa Rank of your website, here some ways to do it, with short-term results.

5 Ways to Increase the Alexa Rank

Daily Content: Try to publish at least 2 articles per day and within a month you may start to see some changes in the Alexa ranking.

Install Alexa Rank widgets: Besides notifying about the results of your Alexa ranking, they will also provide an estimate of how many backlinks your website has. There are three types of widgets: button with ranking and links, the other one with the ranking only, and finally, a graph with daily records of visits. Traffic Widgets

Alexa Toolbar: From experience, I would recommend installing the Alexa Toolbar, because once we access the website, Alexa will count this visit and thus, we may get better results in the ranking. Besides this, the toolbar will also provide you more information about the backlinks of a web site, popular pages, reviews, and more.

Request a review: To calculate the Alexa ranking of a website, not only the amount of daily and monthly visits will make a site popular, but the number of reviews or opinions made with stars will also play a role in the ranking. Ask your readers to do a review or purchase Alexa opinions about your website.

Number of backlinks: As I said before, the number of visits and reviews about a website used to calculate the Alexa rank, and the total number of quality backlinks, may increase the likelihood of achieving a higher ranking for your website. Share the blog and post, Stay tuned with Netdoz
How to Increase Alexa Page Ranking of a Blog
02:14

How to Increase Alexa Page Ranking of a Blog


qualities of a blogger

The qualities of a blogger should be attended at all times in order to become someone popular on the internet. A blogger should have plenty of ideas for creative writing, along with a truckload of motivation. The results sought will not come overnight and there's no guarantee that this will be easy.

These are the two things that you need in order to fulfill your dream of running a successful blog: a lot of exclusive content and readers' loyalty. In each case, time is required to develop the success. This is a process and not a short-term event.

Related: How to Write SEO Optimized Blog Posts

Top Qualities To Become a Successful Blogger

Here are three qualities of a blogger who as a site administrator will need to have, if your goal is to manage a successful blog.

Patience

A successful blog is a product of time and effort and for this, you will need patience. As I said before, the results will not appear quickly overnight, so it is important to realize this from the start. If you are constantly trying to develop new and creative ideas for writing on your blog and, at the same time, you are worried whether you will see any results, this will only make things more difficult.

The building of a successful business online is a "long term" effort and you must decide if you accept this challenge or not. This is one the most important qualities of a blogger.

Credibility

Much of the traffic of any successful blog results from its unique content, as well as its credibility. In fact, the quality of what's in the site, will have a direct impact on what will become viral visitors that are coming to your platform. If you will provide quality content, people will talk about your blog, and once they do it, others may come to see what you have. It depends on you to publish useful and accurate information and your readers will do the rest.

Consistency

Maintaining a steady stream of creative writing ideas is vital to be able to constantly update the blog. The frequency of publication to a proper schedule is related to the amount of time you have available and your level of motivation. However, it is recommended to establish a sort of consistency, so that people can schedule their own visits accordingly. Just remember that the more often you write, the more people will visit, so their loyalty will grow faster and their referrals will be extended.

To become a popular blogger, it is important to have a healthy source of creative writing ideas, along with a lot of patience and motivation. Ultimately, it will be up to you, as a site administrator, to provide the three qualities of a blogger that we discussed above, who is searching tirelessly his goal of having a successful blog. In the end, your own motivation and patience will be the glue with which all the elements will be put together so that your dream will come true. Share the blog and post, Stay tuned with Netdoz.
3 Qualities of a Successful Blogger
02:05

3 Qualities of a Successful Blogger


Friday, 13 March 2015

invite new authors to blogger

If you ever considered working on a blog with multiple authors and you'd like to add others to publish posts or moderate comments, you can invite multiple authors on your Blogger blog. These additional authors have blog posting rights and can be either a guest author or blog administrator.
  1. An author can create and edit only his/her own posts and have restricted access to some of the blog' Settings. There, he or she will be able to access the Posting options and Add a mobile device, or remove themselves from the blog membership. 
  2. An administrator, on the other hand, will have FULL access to the blog' settings and template. Users with this privilege can edit or delete posts made by other members of the blog, add/remove other members or transfer the ownership of a blog.

Related: Add Author's Profile Picture and Name in Multi Author Blog

How to Invite Authors on Blogger


To invite multiple authors on a Blogger blog is really easy. Just follow the steps below:

Step 1. Log into your blogger account at blogger.com and click the name of your blog

Step 2. Click "Settings" on the left side of the page and go to the "Basic" tab:

invite multiple authors on blogger
Invite multiple authors on Blogger
Step 3. Look for the Permissions/Blog authors section and click on the "Add authors" link. Enter the email address for each author you would like to invite, separating each address with a comma.

Step 4. Click "Invite authors" button at the bottom once you're done. And that's it!

Managing Authors


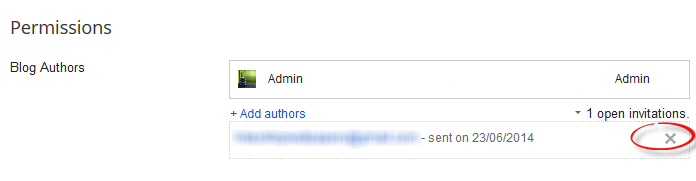
The invited Authors will be listed after the invitations have been sent. They will need to click the "Accept Invitation" button in the invitation email in order to get started. Authors which have yet to accept or decline the invite will be listed under 'open invitations'. To remove an author from the blog, simply click the Remove icon next to the author's email address:

invite multiple authors on blogger
Cancel the invitation
Once the invited member accept your invitation, they will be listed as an "Author" by default. To give a person full admin privileges, you can change the "Author" status in the "Permissions" section of the Settings > Basic tab to "Admin":

add second admin on blogger
Changing an Author into an Admin in Blogger

Please proceed with caution! Administrators have as much power over your blog as you do, including the ability to permanently delete it!

So this is how you can invite multiple authors in blogger. With this feature, everyone on your team can help create different engaging content for your readers to enjoy.
How to Add Multiple Authors in Blogger
02:39

How to Add Multiple Authors in Blogger


page elements in blogger

When following a tutorial to add a gadget/widget or make some customizations in a Blogger blog, some new users may not know the meaning of certain terms, and sometimes, it may be harder to locate them. As for the gadgets, usually it is required to access the blog's layout in order to add or arrange any of the page elements.

For a better understanding, here are some basic explanations about the Page Elements located in the Layout section of a Blogger dashboard.

What are the Page Elements?

Page Elements is, basically, the body of our blog. To access the Page Elements, we need to click on the "Layout" option in the Blogger dashboard.


Understanding the Page Elements sections

The Blogger Layout is made of "sections and elements". The sections mark certain areas of a page. Every section is represented by the tag <b:section> and has an unique "ID" that names its element which is followed by a "class" tag. Each section has some attributes and through these, we can determine the number of elements allowed in the section and if this section gives the option to add a "page element".


Let's take a look to an example of the default code related to the header section found in the HTML of a Blogger template:
<b:section class='header' id='header' maxwidgets='1' showaddelement='no'>
<-- rest of the code -->
</b:section>
Breaking apart the code above:
  1. <b:section is the opening tag of the section.
  2. class='header' - describes the existing group inside the "header" element
  3. id='header' - identifies and specifies the header as a single element.
  4. maxwidgets='1' - determines the number of elements allowed in the "header"; here we have the number of gadgets that we can include in the header section. In this example, '1' means that this section allows us to add only a gadget.
  5. showaddelement='no' - the 'no' attribute means that the header will not show the "Add a gadget" link or we won't be able to move any Page Elements. To activate this option so that we can add new Page Elements (Add a gadget), we should change 'no' to 'yes'. By setting the "showaddelement" attribute to 'yes', we'll be able to arrange the elements as we like, just click on the element that you want to move and drag & drop it wherever you want.
The spaces reserved for adding elements in the existing sections are called Gadgets (or Widgets). You can easily add various Page Elements by clicking "Add a Gadget" link. This will open a pop-up window for you to pick and choose which elements should be added. Click on the Gadget's title or on the blue plus sign symbol to add it to your blog's layout.


After you have added a page element, gadgets can be moved up, down or sideways. You can put them wherever you want. Of all the existing gadgets, the most used is the "HTML/JavaScript". Inside this gadget (widget) you can insert any code, as long as it is in the HTML or JavaScript language.

Each time you decide to add a new gadget, click on the "Add a gadget" link in the area where you want to add it. For example, if you want to add a JavaScript code and want it to appear in the sidebar, you should click on the "Add a gadget" in the "sidebar" section, choose the "HTML/JavaScript" option and paste the code in there.

Once you have added new gadgets (widgets), it is recommended to check the changes by clicking on the Preview button before saving anything. So, if something went wrong, you simply click on "Clear" so that everything that was not saved to return to its previous state. If the position of any Page Elements (Gadgets) has been rearranged, you will need to click on the Save arrangement button in order to see the changes. Share the blog and post, Stay tuned with Netdoz
What is Page Elements in Blogger Layout
02:28

What is Page Elements in Blogger Layout


add custom variable to blogger

In this post we are going learn about the CSS Variable Definitions for Colors and Fonts that could be found at the top of the style sheet of a Blogger blog. The values for the Variable definitions can be modified directly through the Blogger Template Designer where are the settings for colors, backgrounds, fonts and font sizes.
Most default Blogger templates, such as the Minima Template, use these settings for the CSS, which makes it easier to modify these variables through the Blogger dashboard, using the "Template Designer" (Template > Customize) editor and accessing to the "Advanced" section.

blogger template designer, variable definitions

If the definitions are already established in the CSS, we'll be able to change the background colors, font colors, styles or sizes, directly from our Blogger dashboard without having to touch the HTML code of our template.

If these values are not set, we can define them by creating our own variables. The more variables are created, the greater will be the ease of changing colors and fonts of the Page Elements by going to the "Template Designer" and accessing the "Advanced" tab.
In some cases, we can't change the color or font of a particular template if the designer has not implemented the variables in the template and didn't defined and specified a particular value directly into a property, and if there is no definition for these values, we may not be able to customize it through the Blogger's Template Designer.

There are two types of variables:

1) Color Variable:
<Variable name="body.background.color" description="Outer Background" type="color" default="#66bbdd" value="#66bbdd"/>
In red is the variable name. Here you can put any name you want, however, it must not contain spaces, that's why we may see some variable names using a dot "." between each word.
In green is the description that will appear in the Fonts and Colors panel (it can contain spaces).
In blue is variable type, which in this case is "color"
In purple is the default value, which runs in the absence of any other value.
In orange is the value of the selected color.

2) Font Variable:
<Variable name="body.font" description="Font" type="font" default="normal normal 12px Arial, Tahoma, Helvetica, FreeSans, sans-serif" value="normal normal 12px Arial, Tahoma, Helvetica, FreeSans, sans-serif" />
In red the variable name without spaces.
In green the description of the variable, may contain spaces
In blue is the type of the variable, which in this case is font.
In purple the default font.
In orange is the font that you choose.

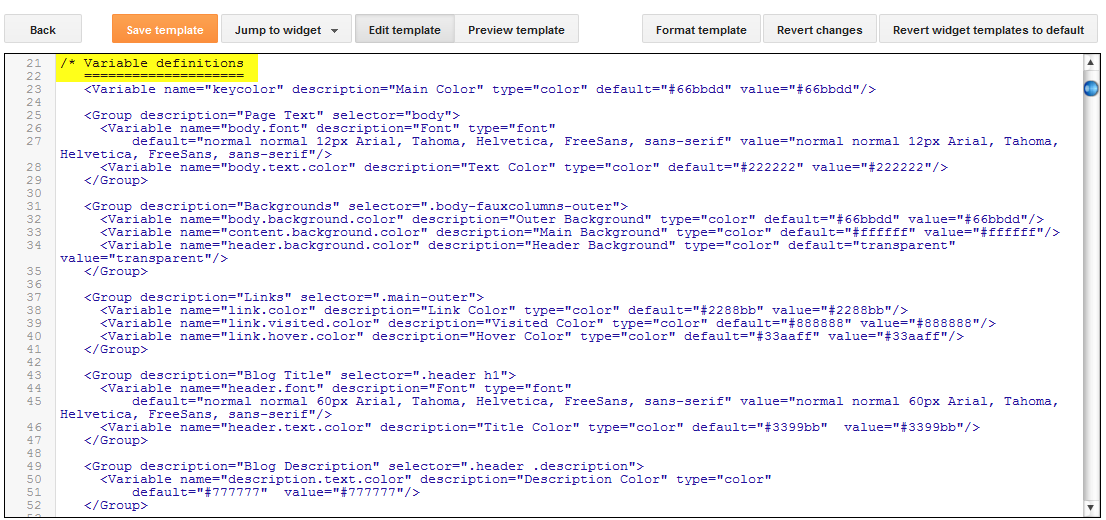
We can find the variables definitions in the <head> section of our Template by accessing the HTML code (click on the Edit HTML button). There we should see a pair of <b:skin>..</b:skin> tags. The CSS style declarations will go in between those tags, along with the variable names.

variable definitions

How to Create Variables with type Color

Now, let's see how we can create type="color" variables in our template.

Please copy the below snippet and replace the names and types as you like, then paste the code below this comment:
/* Variable definitions
   ====================
Code to copy:
 <Variable name="NAME" description="DESCRIPTION" type="color" default="#xxxxxx" value="#xxxxxx" />
For a better understanding, let's take a look at this example with variable of type "color":
<Variable name="variablecolor" description="Variable with light blue color" type="color" default="#DDF2FF" value="#DDF2FF" />
color variable type

Here I have created a variable of type "color", with the "variablecolor" name. The color values (#DDF2FF) can be applied to all the borders of my blog and whenever I want to apply color styles to a specific border, I will type it like this:
border: 1px solid $variablecolor;
Note that I have added the "$" symbol before the variable's name which should be added everytime you want to implement a new variable definition.

Once we have created the variable, we can apply it on any property (not only borders) of any selector (page element) where it is possible applying the chosen color.

For example, if I want to add this color in the main-inner background (sidebar and posts area), I will add it just after the "main-inner" class selector, like this:
.main-inner {
background-color: $variablecolor;
}
variable type color, variable definitions

Now that a new variable has been established, save and return back to the blogger dashboard by clicking on the "Customize" button > Advanced tab. You will notice that there is a new variable called "Variable with light blue color" - to change the color, just use the color picker tool.

blogger template designer

How to Create Variables of type Font:

Now let's say I want to create a new variable of type="font" which I want to apply on the title of the sidebar gadgets. I will add it this way:
<Variable name="gadgetstitlefont" description="Gadgets Title Font" type="font" default="normal normal 16px Arial,Verdana,'Trebuchet MS',Trebuchet,Sans-serif"  value="normal normal 20px Cambria"/>
In this variable that I just created, the default font to be searched by the web browser should be Arial, and in its absence, Verdana and so on. Otherwise, apply the Cambria font which is actually the font that we want and which can be easily changed by accessing the Blogger Template Designer.

Once the font variable has been implemented, we can add it to any property of any selector where we want to define this font style.

To define where this variable should be applied (which, in my example, is the title of the sidebar gadgets), I will need to include the values directly in the "h2" property of the "sidebar" (sidebar-right-1) selector, by creating the following CSS rule:
#sidebar-right-1 h2 {
font: $gadgetstitlefont;
}
And I will add this above the ]]></b:skin> tag of the Template (don't forget to add the "$" symbol before the variable's name, otherwise it won't work).

variable font type

Now that we have given a new variable, Save the template and return to the Blogger dashboard by clicking on the Template > Customize button and access the Advanced tab. Scroll down and you will notice that there is a new variable named "Gadgets Title Font" - if you want to change the font type or size, you can do it directly by using this panel.

variable font type advanced

After you've decided what font style should be applied, click on the Apply to blog button on the right side.

apply to blog button

As you work on your template design, you can add lots of variables for different colors and fonts, however, for other types of CSS attributes, there's not necessary to create variables. The other types (such as margin, padding) can be included in the HTML of the template (above ]]></b:skin>) just as they normally would be. Share the blog and post, Stay tuned with Netdoz.
How to Add Custom Variable to Blogger
02:25

How to Add Custom Variable to Blogger


Thursday, 12 March 2015

custom domain setting in blogger, add custom domain to blogger

Our web today is a wonderful place. It's increasingly become a knowledge hub for strollers around the globe. And you know what the best part is? It does not have a religion, race or color, that's where perhaps its strength lies in. Point being, no matter what you are after, from details of products to how to use them, from fruit varieties to language origins, from how to hack Facebook account to how to set up a custom domain name in Blogger. Each and everything is there, in abundance and easily available. Now I know you are here to understand how you can setup/host your custom domain on your Blogger account. So let's get on with it, without further delay.

Before we start

It's important that you realize, it isn't difficult to add a custom domain into your blogger account. If you are a blogger, it's perfect if you already own your own blog, it shows your passion and love for blogging and provides you with freedom to move from one platform to another, when and if you need. Also from users perspective, it's much easier for them to remember and visit your blog at customized address like myblog.com than myblog.blogspot.com.

One of the best things about Blogger is that it does not push you to host your site with blogger. It is entirely your own choice to choose from either of two hosting plans 'hosting on BlogSpot' with address myblog.blogspot.com, or going with a custom domain with address myblog.com.

Some Popular Web Hosting Sites:

If you don't already have purchased yourself a custom domain, these are the places that you should be looking for to get one:

- EasyDNS
- 1and1
- GoDaddy.com
- Yahoo! Small Business
- No-IP
- ix web hosting

So now if you have bought yourself a domain, from either of these you would have an IP address and a name. Let's assume our is 'mynewdomain'.com.

Well, it's time to start adding a custom domain to your blogger account.

Remember:

Here we are using setup for GoDaddy.com, the most popular domain name provider. For custom domains from other sites, the steps are almost same, so don't vanish.

Setting Up Blogger Custom Domain

Step 1. Login to your Blogger account at www.blogger.com.

Step 2. Click on your blog and then go to "Settings", choose "Basic".

blogger custom domain

Step 3. Under "Publishing" section, click "+ Setup a 3rd party URL for your blog".

Step 4. Under "Third-party domain settings" next to "http://" type your domain that you just purchased and make sure that you don't forget to add the "www" prefix to the domain name.

set up custom domain in blogger

Step 5. Click "View settings instructions" to get the blogger's official instructions. On the Blogger instruction page, choose the "On a top-level domain (www.example.com)" option.

custom domain in blogger

Step 6. Under the point 9 of instructions, 4 IP addresses will be given, copy and save all 4 of them.

Step 7. Go back to your Blogger Settings and press Save. It won't get saved and an error will appear saying 'We have not been able to verify your authority to this domain. Error 32.'

setting up blogger custom domain

Step 8. Under the error, you will see two fields "Name, Label or Host Field" and "Destination, target, or Points To" field. Copy data of both rows from these fields.

Step 9. Now log in to your GoDaddy.com account and click on "My account" on the upper right corner > select "Manage my Domains".

godaddy manage domains

Step 10. Here you should see your purchased domain name > just click on your domain name.

godaddy domains

Step 11. Click on the "DNS Zone File" tab next to Settings and choose "Use Classic DNS Manager".

use classic dns manager

Step 12. Next, click the "Edit" button to edit your DNS Zone File. 

blogger custom domain

Step 13. Under the "CNAME (Alias)" menu, click "Quick Add" button at the bottom of the screen (see image 1 in the below screnshoot).

Step 14. In the Edit box that now appeared, enter "www" in the first box and "ghs.google.com" in the second.

blogger custom domain

Step 15. Click "Quick Add" again and enter details from second row of the data we saved in step 8.

Step 16. Under the "A (Host)" menu, again choose Quick Add (see the below image).

Step 17. Host will be @ and the "Points to" value should be the one provided by Google IPs, saved in step 6 above. These are the Google IPs that you should get:

216.239.32.21
216.239.34.21
216.239.36.21
216.239.38.21
Step 18. Add all 4 of them one by one and delete old host as you won't need it anymore. 

custom domain in blogger

Step 19. At the top of the page, click on the "Save Zone File" button to save your setings.

Step 20. Now go back to Blogger and try to save settings again. The registration process takes 24-48 hours, so don't worry if you get an error again. Come again later to Blogger after 24-48 hours, repeat step 2 to 4, press Save and the error should be gone.

Step 21. After your URL starts working, click on the "Edit" link next to domain name on setting page.

Step 22. Check the "Redirect... to..." checkbox below your site address to ensure that even if the visitors will miss out the www part, they will still be able to reach your site.

blogger custom domain

Step 23. And that's it. Enjoy your new URL!

So this was easy, right? Only a handful of steps and we have successfully completed our mission of adding our custom domain in our blogger account. In case you haven't yet, stay patient wait for 2 days and try again. Or repeat steps 1-22, and make sure you don't miss any. Otherwise your new URL is ready and all set to roam around the wonderful world of web. Share the blog and post, Stay tuned with Netdoz.
How to Set Up Custom Domain in Blogger
05:31

How to Set Up Custom Domain in Blogger


Wednesday, 11 March 2015

tips to avoid getting adsense banned

As many of you already know, Google Adsense is the most popular and generous advertisment service from Google that gives you recurring income. However, some people don't bother to read the Adsense policies and they usually violate AdSense Terms and conditions without knowing and as a result, later to find out that their accounts have been disabled. Many times, fraud clicks are the main cause. But there could be many other reasons for an Adsense account to be disabled.

So, if you want to keep your Google Adsense account safe, please read and keep in mind the following rules:

  1. Never use adult, violent or advocating racial intolerance content on your site.
  2. Never copy paste any article from any other website. Google can easily find out which one is original.
  3. Never click on your own ads. Google can analyze all the clicks made on your ad units.
  4. Never place above your Adsense ad units texts like "Click on ad below", "Please click below" etc. instead you can use label headings as "sponsored links" or "advertisements".
  5. Never say your friends to click on your ads on social networking websites like Facebook
  6. Don't put unwanted links, pop-ups on your website. Keep interface quite neat and clean with proper navigation and all. Google also looks for the quality standard of websites.
  7. You must have a privacy policy page which must contain a description about the use of Google AdSense on your website. This is the latest policy introduced by Google. Many webmasters don't know about it which results in their account getting banned.
  8. Hide Adsense ad units from Contact and Privacy Policy page (read here to see how you can do that) Place ads only on Content Pages. Advertisers pay only for content based ads.
  9. Never display Adsense ads in floating boxes with images or texts that could overlap or cover the ads. However, you can use floating text, images on your website under the condition they don't play with your Adsense ads.
  10. Never place more than 3 ad units and 3 ad links or 2 adsense search boxes on any web page.
  11. Do not confuse with adjacent images - It was a common policy to increase CTR by placing same number of images as the number of text ads, which falsely gave the impression that the text ads represented an explanation to these images. Inserting a small space or a line between the images and ads is not allowed. Make sure that the ads and images are not arranged in a way that could easily mislead or confuse your visitors. Read more about this here
  12. Do not send your Google adsense ads code to anyone.
  13. Never place your Google ads any unit under any drop down menu, if you do so you are Violate Google Adsense TOS.
  14. Never place Adsense ads on empty pages (pages with no content), pop-up pages, error pages, contact forms or registration pages.
These rules are the minimum requirements for maintaining an AdSense account in a proper way.
Whenever needed, it is better to ask for adsense help from the learned staff of Google Adsense. At least, you'll get authorized and very helpful tips from them! Good luck and be wise :)
Tips to Avoid Getting Banned from AdSense
12:48

Tips to Avoid Getting Banned from AdSense